Explanation
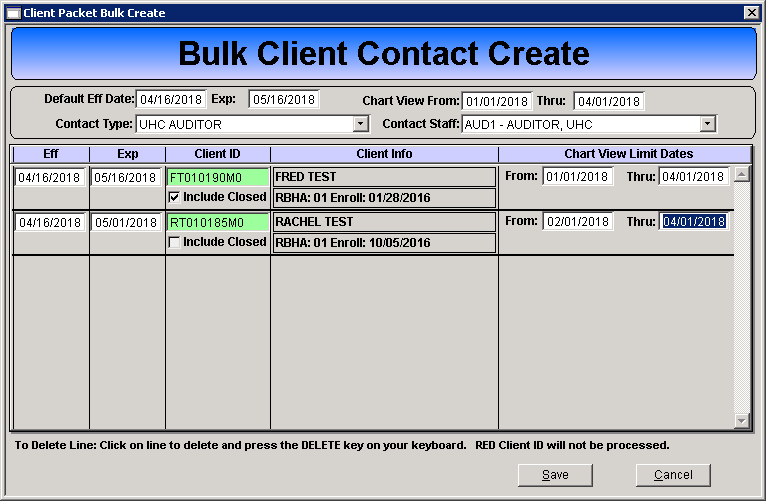
The Bulk Client Contact Create window is used to configure and limit access for external auditors. It can also be used to add a client contact for multiple clients. The contact type record is automatically added to the Client Status form when the Bulk Create window is saved.
Access: Clinical > Bulk Add Client Contacts

Default Eff and Exp Date: The date range for this record. The entered default dates will auto-populate in the Eff and Exp date fields for the individual client lines.
Chart View From and Thru Date: The date range the Contact Staff will have access to the Client Chart.
Contact Type: The Contact Type to be added.
Contact Staff: The Staff for the Contact Type.
Eff and Exp Date: The date range for the individual client record, these dates will populate with the Default Eff and Exp dates but can be edited as long as the date range falls within the default date range.
Client ID: The Client ID of the client that will have the contact type added.
Include Closed Checkbox: If this checkbox is checked, dates of service within closed enrollments for this client will be accessible if the dates fall within the Chart View Limit Dates entered.
Chart View Limit Dates From and Thru: The date range of the clinical documentation (forms, packets and progress notes) that are available within the client chart for the Contact Staff.
Configuration
Prior to using the Bulk Add Client Contacts window the following must be completed:
- Internal contact type created. (Clinical > Client Contact Type)
- Staff record in the Staff Master. (Core > Staff > Staff Master)
Once a record is added it cannot be edited or expired from this window. The record can only be edited or expired through the Client Status form.
You must use TAB to navigate this window. Not using the Tab key will result in the inability to select a client.
A record can only contain one Contact Type and one Contact Staff. Create additional records for additional contact types and staff.
- Open the Bulk Client Contact Create window.
- Enter the Default Effective and Expiration dates.
- Enter the Chart View From and Thru dates.
- Select the desired Contact Type from the drop down.
- Select the desired Staff from the drop down.
- Tab through the Eff and Exp fields to populate the default dates or enter the desired date range for this specific client record.
- To allow access to a closed client enrollment check the Include Closed checkbox.
- Enter the CT|One Client ID or name in the Client ID field. PRESS TAB. If a match is not located a prompt will present to use the Client Lookup, select the desired client from the Client Lookup window.
- TAB out of this field once the client is selected. Note: Pressing enter or clicking out of this field will remove the client and the window will have to be refreshed to add a client.
- Tab through the Chart View Limit Dates to populate the default dates or enter the desired date range for this specific client record.
- To enter additional records press TAB.
- Click the Save button.